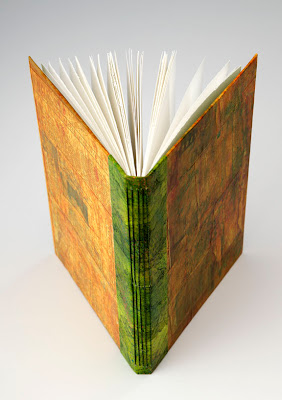
Since I made my own sketchbook for the
Sketchbook Challenge, I thought I'd share with you my go-to mode for making a hardcover book using only basic book-binding skills. If you can glue and do a simple pamphlet stitch, you can make this book. This tutorial is taken from my forthcoming book
"Adventures in Mixed Media" (April 26, 2011), which has a whole chapter on making books and boxes. This version is considerably shortened, so if I've left anything out that is crucial, please e-mail me!!
You will need:
- Paper for signatures (i.e. pages)
- Illustration board, mat board, chip board, or book board for the covers
- Paper for covering the book boards, or “cover paper”
- White glue or PVA
- The basic tool kit: scissors, a craft knife, a glue brush, pencil
- An awl or push pin
- Waxed linen or other strong thread
- Needle
- Bone folder
MAKE THE PAGESI usually start a book by making the pages, or
signatures (pages grouped together), first, and then fitting the cover to the pages. To make the signatures, take a sheet of your chosen paper (I often use 80lb. drawing paper, 18"x24"), and quarter it, either by folding and tearing with your b one folder, or using a paper cutter. Fold each quarter in half and then nest them one inside the other. This is your first signature.
Prepare five signatures in this manner. I usually end up with each signature containing four folios. Then mark and poke three holes, using an awl or push pin, in each signature at the fold: one at the center, and one at each end about a quarter inch from the edge of the paper. When the signatures are stacked and you are looking at the spines, these holes should all line up.
Now, to
MAKE THE COVER:
1. Cut two book boards so that they extend about 1/8" beyond your signatures on the top, bottom, and fore edge, but flush at the spines.
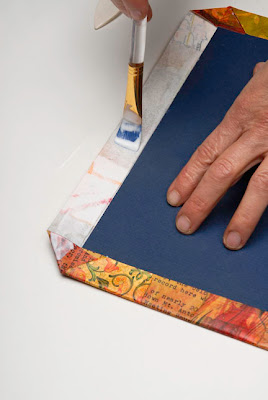
2. Cut your cover papers (either your own collaged papers or decorative paper) big enough so that they extend at least one inch beyond the top, bottom, and fore edge of the book covers, and about 1/4" shy of the spine edge. (The spine edge will be covered with a contrasting paper). Glue the boards to the cover paper as shown here.

3. Working with one board at a time, glue down the top and bottom corners.
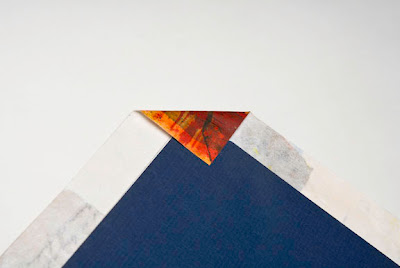
Then fold and glue down the top and bottom edges. Finally, do the same with the fore edge.
4. Cut a piece of paper (I use
Lokta or other similarly strong paper) for the spine that measures the length of the spine plus an inch overhang on both top and bottom (spine + 2"); the width should be the width of the spine (stack your signatures and compress
lightly), plus at least 1/2" overhang so that it overlaps the cover paper at the spine edge.
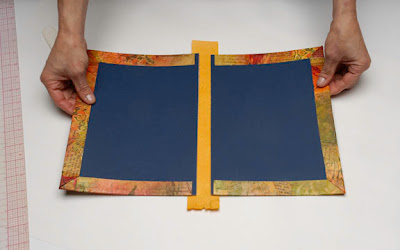
5. Glue the book boards to the spine as shown above. Then turn over and glue the top and bottom of the spine paper.
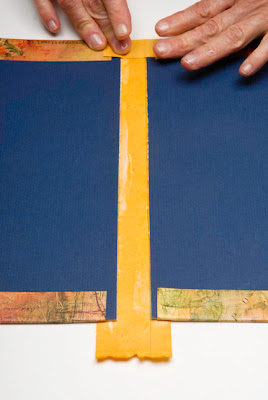
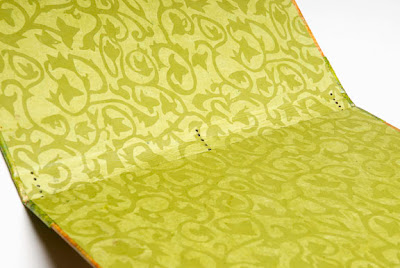
6. Cut a piece of decorative paper about 1/8" all around smaller than the book cover. This will be your "end paper", lining the cover. Glue this sheet inside the book cover, and reinforce folds along either side of the spine.
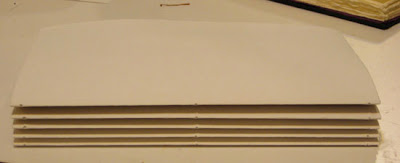
7. Punch holes in the spine of the book cover as shown in photo. First mark them with one of your signatures so that they line up. You should have five equidistant holes in the spine at the middle, the top, and the bottom.
SEW SIGNATURES TO THE COVER1. Starting with the back signature (or front, depending on how you orient the book), cut a length of
waxed linen thread three times the length of the spine and thread a needle. Begin sewing by passing the needle from the inside of the signature through the center right-most hole in the spine, leaving about a 6" tail.
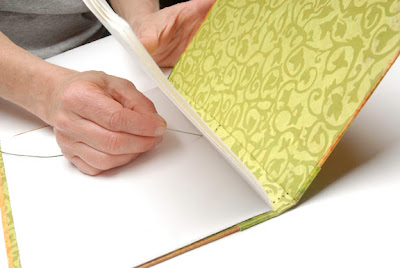
2. Now sew from the outside to the inside through the top hole of spine and signature in the same right-most position. Pull the thread almost taught, leaving a little wiggle room.
3. Bring the thread (you're on the inside of the signature now) to the bottom hole, and sew from the inside to the outside, through signature and spine. Pull thread almost taught.
4. Sew back into the middle hole from the outside of the spine through the signature to the inside. Now snug up the thread so the signature is right up against the spine.
5. Make sure that the tail you left and the needle end of the thread are on either side of the thread that goes down the center of the signature. Tie a simple square knot and clip the ends to about 1/4".
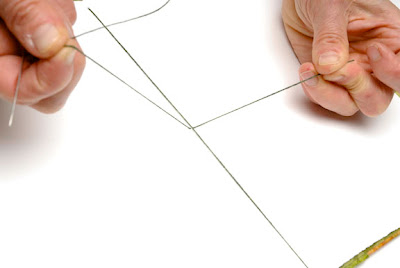
Sew each signature to the cover at the spine like this, and you have your own handmade sketchbook!
I think these how-to photos are from a different book than the finished book. Hope that is not confusing. Don't forget to e-mail me or comment if there is something that isn't clear.

 OK, so I tried the Portfolio water-soluble oil pastels again, inspired by iHanna, who kindly commented and gave me a link to her demonstration. Check it out. She uses the oil pastels on un-primed paper, then coats it with acrylic medium when dry. I did a variation on that by brushing on a tiny bit of gesso, just here and there, on the page before playing with the oil pastels. Then, after brushing on some water, I scraped the color around with a credit card, my favorite art supply. Here is a detail of the above.
 And here is another page in this ongoing sketchbook:
 On another topic: I'm gearing up for my Color and Composition class, "Creative Beginnings", which is on Friday. I got my supplies together this afternoon and wrote the hand-out. Here are a few paints I'm bringing:
 These Blick matte acrylic craft paints are not as bright as I'd like, so I'll be sharing my Goldens for color mixing. I use a lot of craft paints along with my Goldens in Scribble Collage. Thanks for visiting!


