Showing posts with label tissue paper. Show all posts

Wednesday, March 9, 2022

Stained Tissue Paper

 This months raffle, see image in the right margin, features all you need to make stained tissue paper for collage: a set of ten Golden Fluid Acrylics (plus I will add a couple from my own stash), a pack of white tissue paper, a 12"x16" disposable palette, and a brush. You supply the water. 

Buy Raflle Tickets Here.

Here is a video I made a couple of years ago on staining tissue paper. 


Recently I have been using stained tissue paper along with other materials in collage. Here are a few examples:

On the Edge #1, 11"x14"


Edging Away #1, 11"x14"

Off the Edge #1, 11"x14"

On the Edge #2, 11"x14"

Off the Edge #2, 11"x14"


I would love to get your comments on staining tissue paper. Have you ever tried it? How do you use stained tissue paper in your work?  
 
Click here to buy raffle tickets for this tissue paper staining kit.

Wednesday, February 19, 2020

Staining Tissue Paper to use in Collage

Here is a video I just released demonstrating how to make stained tissue paper in small quantities. In 2011 I did a post about staining tissue papers in much larger quantity, taking up a lot of space to make full sheets. Read it here and find some useful links. This video shows a more compact version.

You need palette paper (or use freezer paper); white tissue paper (I use Blick); fluid acrylic paints - transparent colors give you the best results; water, brushes.... I think that's it.


Stone Stack #6,  9x12"

Stone Stack #7, 9x12"

Stone Stack #8, 9x12"


Stone Stack #9, 9x12"

I used the resulting material in the collages above. These are very simple studies in which I am focusing on scale, value, and arrangement of elements.

You can find the pieces available as prints or products here.

Tuesday, February 22, 2011

Working in Series

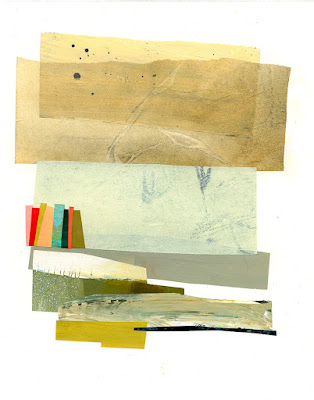
I've been corresponding with a friend on the west coast who has recently begun her collage journey. She is gathering materials, reading books and blogs, taking workshops, getting information and inspiration online, and trying to find her own way in paint-collage-mixed media. Like a lot of us, she seems to get stuck in over-thinking each piece, and I find myself saying frequently: make MORE like that! Choose your materials or theme or images or whatever, and then DO LOTS AND LOTS of small pieces. In other words, I am suggesting that working in a series encourages you to break out of the over-thinking and preciousness of individual pieces, and think of it as a longer term process. Does any of this sound familiar? So here is a small example from my own worktable. I decided to explore the idea of using neutral colors - browns, beige, black, off-white, and see what I could come up with in a series of grid-based abstract collages.

The materials I used included these magazine images from National Geographic:
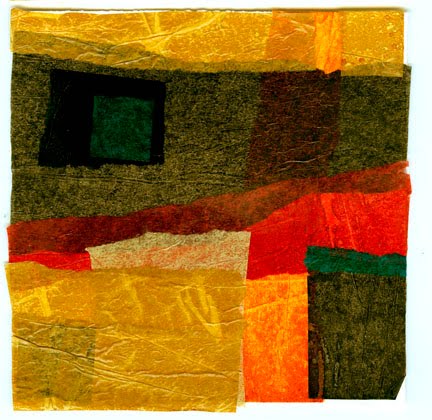
And some of my stained tissue papers, as well as some found text and dress pattern paper:
The collage studies are all approximately 5"x7". These are just that: studies. I have begun an almost daily practice of doing a few of these every day, using collage and paint. It's a simple and approachable format, and keeps my eye in practice.

The papers are cut and torn, and I used acrylic matte medium to adhere them as well as for a top coat.
Even though I thought I would use paint in these studies, I ended up using collage only.
Now they go in my pile of "collage studies", some of which I will continue to work on, and some not.Since I began doing these small studies on a regular basis, I've thought it would be really fun to get together with other artists - in person or in cyberspace - and do a "Collage-Athon", maybe spending a whole day making small collage studies. Or making ten-a-day for a given period of time; or making 100 collages in a given period of time... just a thought kicking around back there. If you have any suggestions around this, please let me know. Thanks for visiting!

Friday, February 11, 2011

Collage Studies

I took some of my stained papers and made a few 5"x5" collage studies. I chose a fairly neutral palette - browns, beige, muted red, black and of course my quinacridone gold. First, here are a few of the papers, not just neutrals, close up so you can see the beautiful markings that the wrinkles make. This green sheet is full size, 12"x18".

And this is a close up of the quinacridone gold:
The buff is full-size:
The orange-yellow is a close up. On this one I painted part of it with diluted orange, and part with yellow. I love the way it came out.
Here are a few more of my collage studies. I tried adding just tiny bits of contrasting colors, in this case, bright ultramarine blue:
This one has just a tiny horizontal line of blue at the bottom of the black shape on the left.


I added a bit of turquoise to this one, but it's pretty subtle.
I continue my experiments with the stained tissue papers. one very nice thing about them is that, unlike colored tissue paper that you buy, the colors are lightfast and they do not bleed. I get the tissue paper in packs of fifty sheets, 12"x18" from Dick Blick.

Wednesday, February 9, 2011

Staining Papers


A lot of collage artists paint/decorate/stain their own papers to use in their work. I was first introduced to this idea by Gerald Brommer in his book Collage Techniques, my very first book on collage. I continue to develop techniques to use in my scribble-painted papers, learning from others and modifying to suit my tastes and needs. Recently I bought a video workshop by Carrie Burns Brown that demonstrates her process of staining tissue papers (and much more) for collage. Tissue paper is great for collage because you can see all the layers through its translucency. I'd been ironing tissue paper to freezer paper in order to give it the necessary stiffness for painting on. Carrie simply paints them with diluted fluid acrylics, and once they are dry they have a little body. I added Golden's GAC-500 medium to my stains (experiment with rations of water to paint; mine is about 1:1 to 2:1), or you could add a little gloss medium, just to give it a bit more body. One drawback is that the papers take a while to dry. A few hours or overnight, depending on how much stain you put on them. Cover your table with white plastic garbage bags before staining the tissue papers.

This is one I stained with quinacridone gold (my all-time favorite paint) plus a little black. You an see how the tissue wrinkles when it's wet. I spritzed it with a little Glimmer Mist on this one before it dried.


I love how translucent tissue papers are! The wrinkles show up in the paper once it's dry. I actually ironed some of mine, between two sheets of parchment.
More on this as I work on ways to further decorate the papers and use them in my work. Carrie's video has much much more and she gives lots of tips on her materials and processes. I may use these papers in fabric-paper as well as collage. I will keep you posted. Thanks for visiting.

Tuesday, January 26, 2010

Collage Dolls


Here are a few of the dolls I made last week. I had loads of fun playing with all kinds of materials, ones that I've been using in other projects for my book. Tyvek, Angelina, fabrics, papers, paper clay, and so forth. Thank you Pamela Hastings for your encouragement!

Tuesday, September 22, 2009

Fabric-Paper

I have been making some sheets of fabric-paper for projects in a new book I am working on. This one I particularly liked. I made it by using a red swirl design fabric as the base, and layering joss paper and tissue paper over that. The green paisley/floral element is a printed tissue paper. I added a few areas of metallic acrylic paints to give it sparkle. I can't wait to make something with it! I would love to hear from any of you who have experimented with fabric-paper.