Saturday, May 26, 2012

Scribble Painting Progress

I wanted to post the progress on the Visual Journal, as I have new video and images to share with you, but my video camera and my computer are not getting along.  While they work out their dispute, I'll show you what I'm doing with the Scribble Paintings.

I decided to do about a dozen 10"x10" scribble paintings limiting the palette to this purple-gold-black-gray-light yellow thing, with accents of bright orange.  I also decided to keep using the same circle and doughnut motifs.  Here are a few that came out of that group:


Here is my wall with some of the scribble paintings.
I did not know where this would take me: either I'd get really good at using this limited set of elements and limited palette, or I'd get sick to death of it, or get stale or predictable.  What happened was the latter.  I got stale, the pieces started looking boring, contrived, self-conscious.  The ones above, to me, were on a roll, the the subsequent pieces are the ones that fell apart.  So I took the opportunity to throw a monkey wrench into them, introduce new colors and elements, "wreck" them into submission.  Here are two that came out of this group:

I covered over lots of this one, added the green/turquoise stamp, some collage, more lines...  It may be still in progress.
This one underwent a few transitional phases; lots of the original is covered up, but I think it finally came together. 
I enjoyed this little experiment of getting myself deliberately into a rut, and then getting out of it. 
 
More on the journal soon.

Tuesday, May 22, 2012

Visual Journal with Gel Plate

I am putting together a little series of visual journals in preparation for Unbinding the Visual Journal, which I'm teaching on:
First I paint, draw, collage, print, or otherwise decorate the unbound folios, or pages.  Then I bind them into a book format, and use the painted pages as starting points for visual exploration.  This is akin to making Scribble Paintings that I cut up and use for collage.  In the following video I use the Gelli Arts gel plate to print on some papers that will end up in my book.

These are a few of the papers on which I used the gel plate.  After printing, I added painting and drawing, leaving room for more painting, drawing, and collage once the book is put together.


There are way more techniques you can use with the gel plate on the Gelli Arts Blog.  For some great tutorials on simple ways to make books, see Sue Bleiweiss's blog, and then buy her book.

Stay tuned for the second part of this post, in which I will show you the book and discuss how I use it.

Tuesday, May 15, 2012

Scribble Painting

I gave my 
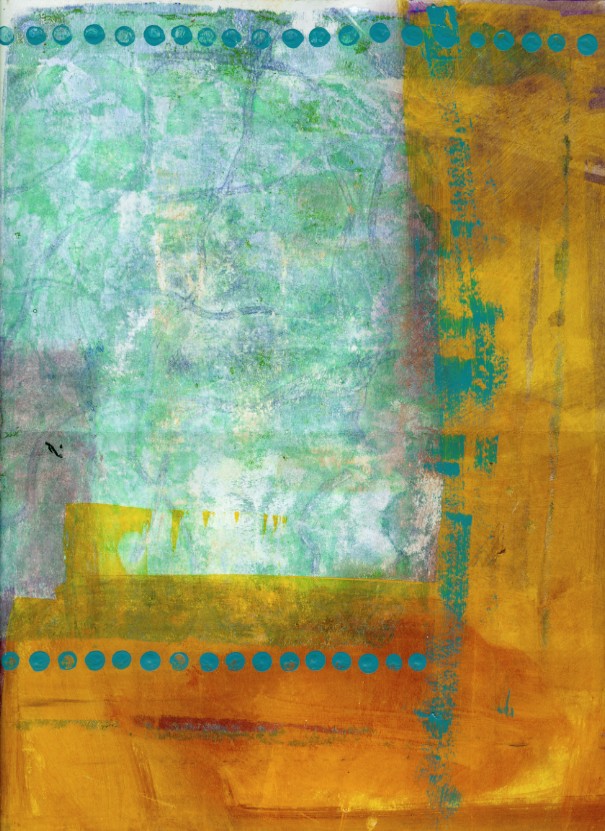
Sketchbook Practice class the assignment of making as series of "scribble paintings", and then cutting them up to make grid compositions.  A scribble painting, or drawing, is one in which you are just making a variety of marks, trying to get some variety, but without regard for composition.  After all, you are going to tear it to pieces, or cut it up somehow anyway.  Here is an example of the process:
Original Scribble Painting

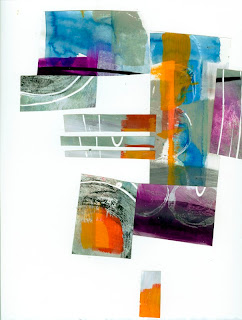
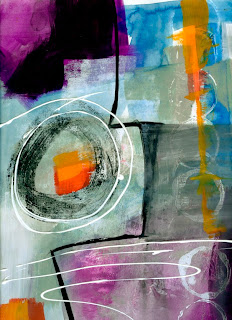
I cut up the painting and placed some pieces in a loose grid composition.

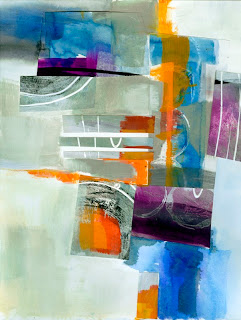
Then I painted over and around it to tie it together.
 I found that working with the intention of tearing up the results, I came up with some pretty interesting compositions.  Some of the pieces I really like, and wish I had done in large format on good paper (the scribble paintings are on cheap drawing paper).


On this one I used the gel plate with string.


Of course, the challenge is to get in the mindset of planning to tear up your piece, but without actually intending to tear up your piece.  I'm sure this is a matter of just doing the work and Putting In the Hours.  I'll keep you posted as I put in more hours and figure this out.

Meanwhile, I am teaching Scribble Painting at CREATE in Chicago on August 23, and at ART and SOUL on October 1.  These are both three-hour evening classes.  I will also be doing plenty of scribble painting in my summer workshop, Collage Journeys in Vermont.

Really, though, this is fun to do in a group, but you can just try it in your own studio.  Give yourself a few parameters (limit your colors, materials, and tools) and just see what kinds of marks you can make.  Go for variety.  Here is an example of how you could proceed:
  1. Make some bold marks, using a relatively large brush and a strong color or black.
  2. Let that dry.  Apply some clean water to the paper, then add paint (a new color) to both wet and dry areas.  See what kinds of shapes that makes. 
  3. Use your paint brush to make lines, using either a third color, or one of the previous colors.
  4. Switch tools.  Use a brayer or a different brush, or a credit card to apply more paint.
  5. Choose a stamp or stencil and add some smaller shapes in a contrasting color.
  6. Make fine lines using one or more pens (Uni-ball Signo Gel Pen in white is fabulous for opaque quite lines).  Doodle. Scribble.
  7. Choose another drawing tool to make different lines.
  8. Keep going like this, or stop and move on to the next one.  Make up your own rules.
To see a few more of my scribble paintings, go to my Flickr site. Have fun with this!  I'd love to hear your ideas or experiences with this process.

Friday, May 11, 2012

My Chickens are Famous!


Well, two of them, Buffy and Sylvie, ended up in STUDIOS magazine in an article I wrote about studio organization. For the unedited version of my article, click here.  But buy the magazine because it has loads of useful information and gorgeous photographs for inspiration.

The opening page spread

See Buffy and Sylvie on the right page, center.
I am excited to have my workspace featured in STUDIOS magazine!  And Buffy and Sylvie are delighted with themselves, preening for the press.  They offered interviews... (that's another post).  In any case, this issue of STUDIOS magazine is full of ideas and tips on studio organization, from the pristine neatnik approach to the more casual, but functional one.  So, whatever your style, you'll find something useful. I think mine is the only studio featuring a Buff Orpington and a Silver Laced Wyandotte.

Aside from describing my painting/collage studio organization, I included a side-bar on my encaustics studio.  If you are interested in getting started in encaustics, this gives you a blueprint for the basic at-home set-up.  I am teaching several encaustics workshops this summer and fall:  
No workshops on chicken husbandry, but if you are anywhere near Rupert, Vermont, let me know and you can meet The Girls in person!

Monday, May 7, 2012

Exploring the Self-Portrait, starting June 6

It's time for another round of Exploring the Self-Portrait, my online workshop for the self-portrait-terrified.   We had a blast with it in January, and the participants made fabulous work.  Here is a little sampling of what we will be doing:
To see the full description of Exploring the Self-Portrait click here.

I used self-portraits in my sketchbook for this encaustic collage.

Sunday, May 6, 2012

Putting In The Hours

I just got my copy of Daniella Woolf's new book, The Encaustic Studio, published by Interweave.  It is a gorgeous book, full of techniques and ideas, and a very thorough introduction to encaustic material, safety, and practices.  I highly recommend it to anyone who wants to get started in this exciting medium.  Plus, it comes with a DVD (brilliant move, Interweave!), so you can see Daniella demonstrate the processes.

Daniella's insightful chapter on Studio Practices and Creativity inspires me to recommend the book to any artist struggling with the Inner Critic, the Inner Perfectionist, the Inner Procrastinator, in short, any artist at all!  One passage that really hit home for me is her section on "putting in the hours":
There is something that happens in our bodies when we put in the hours.  Confidence appears, fear lifts, and we have a sense of empowerment... One day the process becomes easy and natural, and you'll wonder why it was so hard at first.

Don't be discouraged if your initial efforts don't match your vision.  Keep making art consistently; put in the hours and don't worry about the outcome.  Do what's necessary to make room in your life for time in the studio.

I wouldn't say that making art ever becomes easy, but your relationship with the struggle becomes less of an obstacle.  The Inner Critic can more easily be told to take a hike.  Picking up the paint brush or making a quick sketch becomes natural.  Being in the process and not worrying about the outcome becomes easier.  Making bad art becomes just part of the process, not some "failure".  And making art that you like happens more often.

Wednesday, May 2, 2012

Faculty Show at Guilford Art Center

I just got this Virtual Gallery link to the faculty exhibition at Guilford Art Center, in which I had several pieces a few months ago.  There is lots of gorgeous work, including ceramics, textiles, glass, painting, sculpture, and more.  I love teaching at Guilford.  My next workshop there is Paper and Wax: Encaustic Collage, on October 13 and 14.  It will be listed in their next catalog, and I'll post the description soon.

Thanks for visiting.

Tuesday, May 1, 2012

Workshop Photos

I just wanted to share some photos of the workshops I taught last Friday and Saturday.

On Friday I did Scribble Collage with a fabulous group of artist at AVA in Lebanon, NH.  Familiar faces, as well as new acquaintances populated one of the gorgeous, light-filled classrooms, and the day went by so fast!


Martha with her painted papers


Our classroom at AVA
Martha, Carol, Julie, and me, with Claudia in the foreground.
On Saturday we did Fabric-Paper at Ink About It in Westford, MA.
 
Here is Lori, one of the Ink About It owners, making stamped tissue papers.

The mother-daughter team, Judy and Deanna, collaging on fabric.

Patty, holding up a work in progress.  Patty has the best stash of printed tissue paper I've ever seen!
Thanks so much to all of you who participated so enthusiastically in these workshops, and thanks to all of you for visiting my blog!

Thursday, April 26, 2012

COLOR Online in June

As promised, here are a couple of images from my color workshop at Studio Place Arts a few weeks ago.  My online version is "Unlocking the Secrets of Color", and consists of a six-lesson class with online discussion covering color relationships, vocabulary, and loads of exercises in using color.  As a one-day live workshop I sometimes call it "Color Theory and Practice".  We don't get through as much material in a single day, but students do come away with a framework for thinking about and using color.

Beginning a color wheel
Angela making a color gradation

Student work from Unlocking the Secrets of Color online
My next online color workshop begins on June 6. Read the description here.

I'm leaving early tomorrow morning to go teach Scribble Collage at AVA Gallery in Lebanon, NH.  They have a great facility, beautiful classrooms full of light, and an awesome gallery with really interesting and inspiring shows.  The class is pretty full so far.  After class I'm driving to MA to see my parents for one overnight (and get in a Trader Joe's run), then teaching Fabric-Paper at Ink About It in Westford, MA.  That class is full plus a waiting list.  These both should be fun, as I will see old friends and meet new ones.  Thanks for visiting the blog!

Wednesday, April 25, 2012

Photoshop Tutorial

I got several requests for a tutorial on how to make an image montage in Photoshop, as I did for my post "Sketchbook in Progress".  This is a little different as it is on a white background with a drop shadow rather than on a black background.

 I did create the tutorial, and am offering it as a download.  If you are new to Photoshop and want a fairly simple project to begin with, this may be for you.  I use Photoshop CS3, but the tutorial is adaptable to Photoshop Elements as well.  It covers:
  • Re-sizing and image
  • Selecting with the Marquee tool
  • Using the grid for layout
  • Using the Move tool
  • Working in Layers
  • Cropping an image
  • Creating a drop-shadow
  • Flattening an image
  • Saving as a JPEG file for optimal web viewing
Image Montage Tutorial $5
(My link software seems not to be functioning right now, so if you click on "Buy Now", I will e-mail you the tutorial as an attachment).

I find that, not being a computer wiz, I learn new software best by acquiring the skills for a specific project, rather than learning all about each tool.  So I'm planning a short series of tutorials in Photoshop that approach it that way.

I use Photoshop a lot to format, size, and color correct images for my website and blog.  I use it to make flyers, postcards, greeting cards, and other print items.  And I use it to "knit together" an image that I've scanned in parts, one that is bigger than my scanning bed.  I occasionally use Photoshop to audition colors or collage elements, but I don't use it to make "digital art".  I'm addicted to the materials themselves.  How do you use Photoshop or other image editing software?  Would you be interested in other project-based tutorials?

Sunday, April 22, 2012

Workshops at Studio Place Arts

I just did a really FUN workshop at Studio Place Arts in Barre, VT last Friday.  We did Mono Print Collage, using the GelliArts gel plate.  I haven't had time to scan anything yet, but I'll post some photos.

Here are some of the papers we made:


Sally working on a collage-print:


A finished collage-print:

Marianne Mullen, the Creativity Maven, working on several collage-prints:


A couple of weeks ago I taught a color workshop at Studio Place Arts, but more about that in another post.  Thanks for visiting!

Monday, April 16, 2012

Sketchbook In Progress

Thanks for all your comments on the gel plate work. It is fun fun FUN, and I'll be doing more.  Meanwhile, I am totally blown away by the work that's happening in my Sketchbook Practice class!  Check this out:
This is an exercise in exploring line.
And this is about circles.
Who knew you could get such fabulous variety from fairly simple exercises.  I will be offering this class again in the fall, date to be determined, but will definitely incorporate some of the exercises in my Collage Journeys in Vermont workshop this summer.  Thanks for visiting!