Showing posts with label fabric. Show all posts

Thursday, June 30, 2011

Prayer Flags

Back to some fabric and stitch. I was inspired to do a couple of Prayer Flags by Jane LaFazio, who told me and the other Sketchbook Challenge bloggers about a Prayer Flag Project initiated by Vivika DeNegre, a fabulous fiber artist. I love the idea of prayer flags as a format for artistic expression, as well as their original purpose - to spread blessings on the wind.

Here are my two prayer flags hanging over the brook that flows just behind my studio:


And here they are separately:


I used acrylic paint on muslin, and employed the "resist and water" techniques demonstrated here. I collage on the fabric with painted/textured deli paper, as demonstrated here. And, of course, used some of my scribble painted papers. I did some simple machine stitching, and sewed beads on by hand. Each flag is only 5"x8". Check out the Prayer Flag Project, and create your own!

Monday, May 23, 2011

Digital Art Tutorials

Cloth Paper Scissors Magazine has just put out a free e-book of four digital art tutorials, one of which is mine! I'm thrilled to pieces to be included in this e-publication, and it is FREE! You can download it HERE. In my tutorial I discuss how to alter images in Photoshop and print them out on fabric to use in fabric/paper collage. Here are a few pieces in progress using these techniques. The finished pieces are in the e-book.

"Forest Dream"
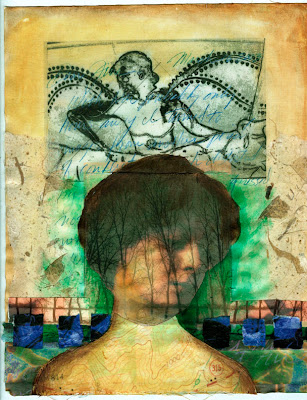

"Pedestal"

I want to show you in a little more detail how I got some of these layered images in Photoshop.

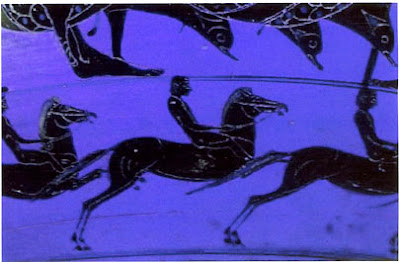
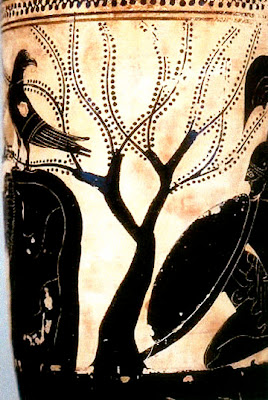
First, I scanned some images of these Greek vase paintings, and made them the same width, 5". (In this post they don't look the same width, but trust me).
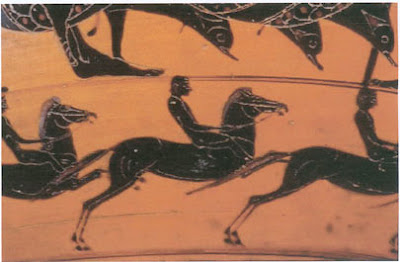
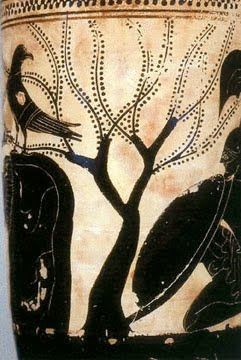
In Image 1, I went to Image > Adjustments > Hue / Saturation and played with the hue slider to change the color:
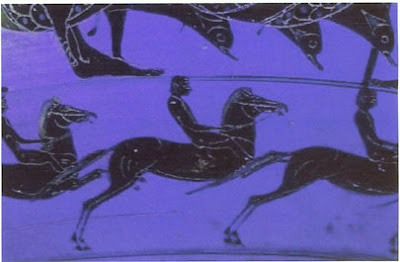
Then I went to Levels (Image > Adjustments > Levels) and used the left and right sliders to bring up the highlights and darken the darks:
On Image 2, I simply used Levels to brighten the lights and darken the darks:
Now, here comes the fun part. Using the Move tool, I moved Image 1 onto Image 2:
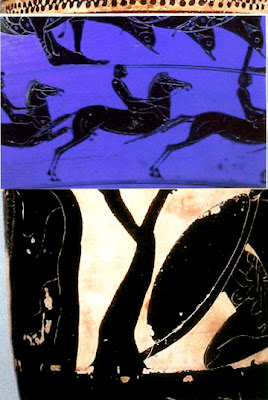
This creates a layer over a background. In the layers panel, I double click on the layer (Image 1) and that opens the Layer Styles box. I play with the Opacity slider to make the image more transparent so you can see Image 2 underneath Image 1.

I then cropped the image using the crop tool:
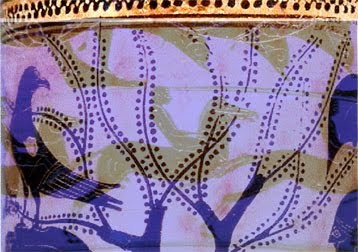
Then I flattened the image, Layer > Flatten.

To selectively change the color I went to Image > Adjustments > Replace Color, which opens a dialog box like this:
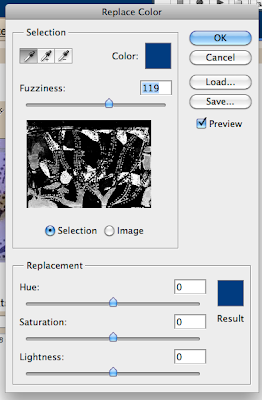
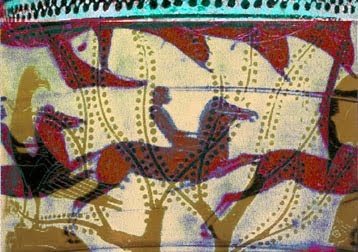
Click on the color in the image that you want to replace (I clicked the gray of the horses), then play with the hue, saturation, and lightness sliders to change that color. The Fuzziness slider determines how broadly you want to define your selected color, and that color will show up as white in box that shows the image. Here is my result:

Then, just for fun, I played with the Hue / Saturation tool again. Image > Adjustments > Hue/Saturation. Here is another altered version of the image:
I know this tutorial requires some basic knowledge of Photoshop, so I hope there are enough of you out there who can take advantage of it. Do get the free e-booklet from Cloth Paper Scissors! There are three other tutorials with fabulous art.

Wednesday, February 16, 2011

Advance Copy

I finally got my advance copy of Adventures in Mixed Media, and I am happy to report that it looks terrific. Nice color reproduction; the book design is awesome; I'm always impressed with the work of my photographers, John Polak and George Bouret. The official release date is April 26, but you can pre-order the book from Amazon if you like. I will bring copies to Art Unraveled in August, and Art and Soul in September to make them available as well. Here are a few sneak previews.

Making a simple pamphlet-stitch book:
Remember these paper bags?
I did a chapter that includes making these shrines from foam core. The gorgeous one on the right is Carol Owen's; she is the inspiration for this project.
This chapter on Fusion, Fabric, and Fiber opens with a photo of Sue Bleiweiss's fabulous tea pot:
A couple of my own fusion fabric pieces:
There is a chapter on Mixed Media Dolls. The doll in the upper right of the left page is by Ingrid Dijkers.
And here is some eye candy from the chapter on books and boxes: paper mosaic with paper gems and glue gems. All the sparkle and glitz you could stand.
Thanks for visiting! Don't forget to check out the Sketchbook Challenge blog.

Friday, August 13, 2010

Workshop Report


We had a fabulous fabric-paper workshop in Guilford last weekend. Thanks to all who attended and to Guilford Art Center for hosting it. I hope to teach another workshop there next summer. Here are a few pix from the workshop: Susan's mini-quilt in progress - Susan really got into the bead embellishment! - a couple fabric-papers from Cathy, and a few samples that I made.

Wednesday, August 4, 2010

Fabric-Paper


Here is one of the samples I made for my Fabric-Paper workshop this weekend (detail above, full piece at left). I'm working on a series of geometric vertical compositions using a limited number of fabric-papers. The workshop is at the Guilford Art Center in Guilford, CT. There are still a couple of spaces available. Thanks for all your comments on my painting/collages in the last post!

Friday, July 2, 2010

FABRIC-PAPER WORKSHOP!!!


I am teaching a really fun workshop on Fabric-Paper at the Guilford Art Center on August 7 - 8. I can't wait for this workshop! Fabric-paper is such a rich, creative, messy medium, combining collage and art quilt techniques. On Saturday we'll paint our own tissue papers and create loads of fabric-paper-collagey materials, learning some basics of color, pattern, and image making. Sunday will be devoted to making a fabric-paper mini-quilt. We'll go over design basics, and learn techniques of enhancing your image with painting, stitching, and beading techniques. You will come away from this workshop with a renewed confidence in your use of color and composition, as well as a toolbox of techniques and ideas that can be applied to fabric paper, quilting, collage, and other mixed media projects.

Wednesday, March 17, 2010

Pizza Book


I am on what I hope is the home stretch of my mixed media book. I have all the final photographs and am busily writing captions for many of them. I want to share ALL the photos on my blog, but I don't think that would go over so well with the publisher. Here is one, though, which may or may not make it into the book. It is my "Pizza Book" for pizza recipes. The cover is made from a fused fiber sheet, fused to a stiff interfacing. The tomatoes and basil leaves are cut from fabric I designed for Free Spirit Fabrics several years ago. I just love these tomato slices! They are fused to the background and then stitched by machine. I added a few beads to the tomato seeds. This is a one-signature book sewn in a few places to the cover at the spine. Now I have to compile all my pizza recipes. Anyone want to send me a recipe? If anyone wants a few tomato slices I'd be happy to send them.

Tuesday, January 26, 2010

Collage Dolls


Here are a few of the dolls I made last week. I had loads of fun playing with all kinds of materials, ones that I've been using in other projects for my book. Tyvek, Angelina, fabrics, papers, paper clay, and so forth. Thank you Pamela Hastings for your encouragement!

Thursday, January 14, 2010

Fabric Collage


Just yesterday I was browsing blogs and found a little tutorial on fabric scrap collages. Not that I've never done this before, but somehow at that moment, a simple, straightforward project was just what I needed. I used a floral upholstery-weight fabric for the background, some tea towel fabric, my own hand-painted paper, and a few other snippets of this and that. After making the basic collage (fusing each piece down with fusible web) I stitched around the tea cup and saucer and painted the background and tablecloth. The little tea tag hangs off the collage. The reverse side says "Smile". Right now I'm about to make some collage samples for a workshop I'm giving on Saturday at Ink About It, called Painting with Paper. Tomorrow evening I'm giving an evening workshop on how to write a book proposal. Both workshops filled up quickly!

Tuesday, January 12, 2010

Fused Fabric Patchwork


I made this small piece of patchwork (16" square, approximately) with pieces of fusion fabric. Fusion fabric is made by layering fabric, papers, threads, and fibers on a base fabric using fusible web, such as Mistyfuse. It is inspired by Indian patchwork made with discarded ceremonial garments and saris, with all kinds of embroidery, beading, and shisha mirrors. I left mine un-embellished, as the fabrics themselves are so rich. I'm making it into a pillow cover.

Tuesday, September 22, 2009

Fabric-Paper

I have been making some sheets of fabric-paper for projects in a new book I am working on. This one I particularly liked. I made it by using a red swirl design fabric as the base, and layering joss paper and tissue paper over that. The green paisley/floral element is a printed tissue paper. I added a few areas of metallic acrylic paints to give it sparkle. I can't wait to make something with it! I would love to hear from any of you who have experimented with fabric-paper.