It's summer here in the northern hemisphere, and time to kick back a little, take things a bit slower or easier (anyone who knows me is going to roll their eyes at this - yeah right!). For me it's more challenging in the summer to delve deep into a series of paintings, because I get interrupted and distracted easily. Neighbors stop by, I have construction going on, gardening, more bike rides because of the longer days. So I put together a little kit of art materials that you can pick up for quick, easy, fun art. Art Lite. In Small Bites.
A page spread in my little sketchbook, using most of the materials in my Portable Art Studio
You can put together whatever materials you are comfortable working with, just as long as they don't include acrylic paints and mediums, which require some set-up and clean-up. The Portable Art Studio features materials that are easy and convenient. You can probably put together a kit from things you already have in your studio. Here are my picks:
A small set of pan watercolors such as Sakura Koi Watercolors
A small set of water soluble crayons, such as Caran d'Ache NeoColor II Water brushes
Small scissors and a glue stick (any type)
A small-ish sketchbook paper that will take watermedia
Card Stock: this works great as an inexpensive substrate for small collage. Get it at any office supply store.
Some paint markers. My favorites are Posca Markers in a couple of sizes Micron Pens or other fine permanent felt tip pens (not Sharpies)
A good selection of collage papers in a variety of colors and patterns. Include found text, your own painted papers, decorative papers, maps, junk mail, etc. Variety is key.
Thanks for all your feedback and commentary on my Solstice Series. I am happy to hear so many of you are interested in a tutorial on this technique. I'll post the video first, and then a few finished pieces and pieces in progress.
Here is the piece demonstrated in the video. It is just the beginning of a piece:
A piece from my post the other day, only developed a little further:
This one makes use of the same technique, plus the gooey stuff in the middle, which is a demonstration for another time.
And one more in this Solstice Series:
FYI: My online workshop "Unlocking the Secrets of Color" is still open for registration. It begins June 29. The same is true for "Keys to Dynamic Composition". I have great groups in both workshops already signed up, and if you care to join either one, click here.
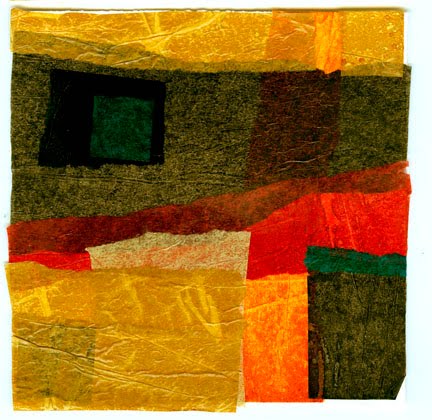
I took some of my stained papers and made a few 5"x5" collage studies. I chose a fairly neutral palette - browns, beige, muted red, black and of course my quinacridone gold. First, here are a few of the papers, not just neutrals, close up so you can see the beautiful markings that the wrinkles make. This green sheet is full size, 12"x18". And this is a close up of the quinacridone gold: The buff is full-size: The orange-yellow is a close up. On this one I painted part of it with diluted orange, and part with yellow. I love the way it came out. Here are a few more of my collage studies. I tried adding just tiny bits of contrasting colors, in this case, bright ultramarine blue: This one has just a tiny horizontal line of blue at the bottom of the black shape on the left. I added a bit of turquoise to this one, but it's pretty subtle. I continue my experiments with the stained tissue papers. one very nice thing about them is that, unlike colored tissue paper that you buy, the colors are lightfast and they do not bleed. I get the tissue paper in packs of fifty sheets, 12"x18" from Dick Blick.
A lot of collage artists paint/decorate/stain their own papers to use in their work. I was first introduced to this idea by Gerald Brommer in his book Collage Techniques, my very first book on collage. I continue to develop techniques to use in my scribble-painted papers, learning from others and modifying to suit my tastes and needs. Recently I bought a video workshop by Carrie Burns Brown that demonstrates her process of staining tissue papers (and much more) for collage. Tissue paper is great for collage because you can see all the layers through its translucency. I'd been ironing tissue paper to freezer paper in order to give it the necessary stiffness for painting on. Carrie simply paints them with diluted fluid acrylics, and once they are dry they have a little body. I added Golden's GAC-500 medium to my stains (experiment with rations of water to paint; mine is about 1:1 to 2:1), or you could add a little gloss medium, just to give it a bit more body. One drawback is that the papers take a while to dry. A few hours or overnight, depending on how much stain you put on them. Cover your table with white plastic garbage bags before staining the tissue papers.
This is one I stained with quinacridone gold (my all-time favorite paint) plus a little black. You an see how the tissue wrinkles when it's wet. I spritzed it with a little Glimmer Mist on this one before it dried.
I love how translucent tissue papers are! The wrinkles show up in the paper once it's dry. I actually ironed some of mine, between two sheets of parchment.
More on this as I work on ways to further decorate the papers and use them in my work. Carrie's video has much much more and she gives lots of tips on her materials and processes. I may use these papers in fabric-paper as well as collage. I will keep you posted. Thanks for visiting.
Here are a few pieces I have been working on post-Rupert Workshop. There are about half a dozen more in progress, and I work on them all at the same time, which is probably evident from the similar color scheme and compositional elements. My process begins with a painted or collage "start" - random painting, collaging, building up pattern and texture. Then I proceed to add layers of paint and collage, obscuring much of what came before, but adding new elements. Often a piece will change course dramatically several times over in the course of its journey towards completion. Completing a piece in any one work session is never the object. I find that if I keep focused on the process, pieces have a way of resolving themselves, or not, in their own time.
Art Unraveled proposals for workshops are due next week, and I'm proposing a workshop that focuses on this process of layering paint and collage. Of course, I'll include other tried-and-true workshops in my proposal as well. I'll keep you posted on that.
I think I'll try another color scheme for the next group. I love this quinacridone gold and turquuoise thing, but I should probably challenge myself in the color department. Any suggestions? I love your comments!!
OK, I've been bragging about the workshops that I am teaching. Now I get to be a student and TAKE a workshop! Karen Rosasco, whose work is pictured here, is teaching a workshop in Experimental Watermedia at the Art Center at Old Forge in Old Forge, NY, on July 8, 9, and 10. I can't wait! I love her work and am so looking forward to some new inspiration and instruction. The other thing that makes this so exciting for me is that Sally Clark will be taking the workshop as well. I've never met Sally, but have seen her work and love it. She is the mother of my Sweetie's best friend from college, Tim Clark, who is a furniture maker. I know I will learn a lot from both Karen and Sally, and be able to bring some fresh ideas to my own workshops.